The rsync or remote sync, is a Linux/Unix command utility used to synchronize and copy files and directories either locally or remotely.
Rsync may be used to mirror, backup or migrate data across folders, across disks and networks. One notable feature with the rsync command is that it uses the “delta transfer algorithm.”
What this means?. Delta Transfer algorithm works by updating the destination directory with the contents of the source destination. If a change or a new file is created on the source directory, only the particular change will be copied to the destination directory when you run the rsync command.
Please, remember, Rsync use the SSH to transport and sync files and directories between the local and a remote machine,
Installing rsync in Linux
The rsync command comes pre-installed in most GNU/Linux operating systems.
However, if this is not your case. You can install RSYNC by running the below commands in a terminal.
On CentOS & RHEL
yum install rsync -y
On Ubuntu and other Debian based distributions
sudo apt install rsync -y
rsync basic syntax
rsync [options] [source] [destination]
Some of the standard options/parameters used with Rsync command:
-v: – -verbose: Verbose output
-r: copies data recursively
-z: compress file data
-h: Gives output in a Human Readable format
-a: archive files and directory while synchronizing
– – progress: Shows the progress of the Rsync tasks currently running.
You can see all the options available for the Rsync command using the
“- – help” option.
rsync --help
Some rsync examples
1. Copy/sync files locally with -v (verbose) option
That is the most basic rsync command. In this example, I will copy files between the ‘source‘ (~/SourceDir/) directory on the Desktop to the ‘destination‘ (/opt/DestDir) directory in the ‘/opt.’ folder. I will include the -v (Verbose) option so that rsync can provide information on what is going on.
rsync -v ~/Desktop/SourceDir /opt/DestDir
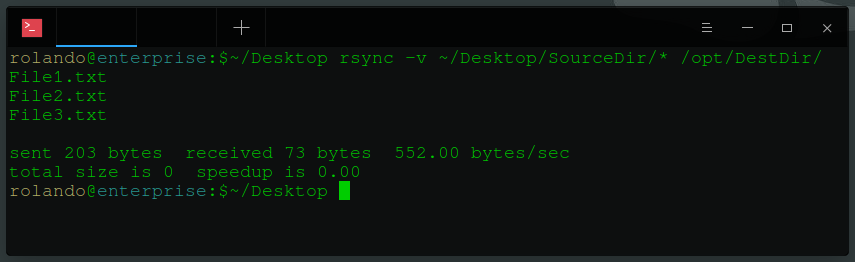
Please, take note that with rsync, if the destination directory doesn’t exist, it will automatically create it.
2. Sync/copy files and directories recursively
In the above command, If there was a directory present in the ‘Original‘ folder, it would be skipped. That is illustrated in the image below.
Use the -r (recursive) option.
rsync -r ~/Desktop/SourceDir /opt/DestDir
3. Sync/copy files between the local machine and remote machine
There are several parameters that you need to know about the remote server/machine: the IP-address, the username, and the user password.
The basic syntax that we will use is:
rsync [options] [local source files] [remote-username]@[ip-address]:/[destination folder]
4. Sync/copy files and directories from a remote server to your local PC
Just like the previous command, we will need to know the IP-address of the remote server. In this example, we will sync files in the ‘Backup‘ folder in the server’s home directory to our Local PC.
rsync -rv remoteuser@remotehost:/home/remoteuser/source /home/localuser/Desktop/destination
5. Use rsync over SSH with the -e option
To ensure the security of files and folders, we will use the rsync over Secure Shell Protocol (SSH).
Additionally, when providing the root/user password – SSH will provide encryption services, ensuring that they are safe.
To use SSH, we will add the -e option that specifies the protocol that we want to use.
rsync -vre ssh source/* remoteuser@[remote ip/hostname]:/home/destination
6. Show progress with rsync command
Some times where you copy multiple files, knowing the progress would be efficient. Fortunately, rsync has this option, the ‘– – progress‘ .
sudo rsync -rv --progress source/* /opt/destination
7. Use rsync with the ‘- – include’ option
Maybe you will have this situation, you only want to sync particular files. With rsync command, you cause the ‘– – include‘ option to carry out the task. For example, you need synchronize files starting with ‘I’ letter only.
sudo rsync -vr --include 'I*' source/ /opt/destination/
8. rsync with ‘- – exclude’ option to ignore particular files
With the rsync ‘– – exclude‘ option, you can exclude files that you don’t want to sync/copy.
In this example, we want to ignore all files starting with the ‘I’ letter.
sudo rsync -vr --exclude 'I*' source/ /opt/destination/
Alternatively, you can use both options in one command. See the example below.
sudo rsync -vr --exclude '*' --include 'I*' source/ /opt/destination/
We are excluding all files apart from those starting with the letter ‘I’
9. Use rsync with ‘- – delete’ command
rsync comes with the ‘– – delete‘ option, If a file is present in the destination directory but no in the source, it will delete it.
rsync -vr --delete /opt/source/ remoteuser@remotehost:/home/remoteuser/backup
10. Set the maximum size of files to transfer with rsync
If you are concerned with storage space or bandwidth for remote file synchronization, you need to use the ‘- -max-size’ option with the rsync command.
This option enables you to set the maximum size of a file that can be copied. For example, a ‘– -max-size=300k‘ will only transfer data equal to or smaller than 300 kilobytes.
rsync -rv --max-size='300k' /opt/source/ remoteuser@remotehost:/home/remoteuser/Backup
11. Delete source files automatically after a successful transfer
Take a situation where you have a remote backup server and a backup directory on your PC. You back up data to the backup folder on your PC before syncing it with the Backup-server. After every synchronization, you will need to delete the data in the backup directory.
Fortunately, you can do this automatically with the ‘--remove-source-files‘ option.
By running an ‘ls’ command on the source folder, we confirm that indeed the files were deleted.
12. Perform a ‘- -dry-run’ with rsync
If you are not sure with the rsync command, with the ‘– -dry-run‘ option, the rsync command will give you an output of what will be performed, but it won’t do it.
Therefore, you can look at this output if its what you expect before going o to remove the ‘– -dry-run‘ option.
rsync -vr --dry-run source/* remoteuser@remotehost:/home/remoteuser/backup
13. Set bandwith limit required to transfer files.
Suppose that you are on a shared network or running several programs, will be efficient to set a bandwidth limit required to sync/copy files remotely. We can do this with the rsync ‘— bwlimit‘ option.
This rate is calculated in kilobytes. Therefore, when ‘– -bwlimit=1100‘ means that only 1000Kb can be transferred per second.
rsync -vr --bwlimit=1100 source/* remoteuser@remotehost:/home/remoteuser/destination
14. Sync the whole files with rsync
Is important to know, that by default rsync only synchronizes the modified blocks and bytes.
Therefore, if you had synced a text file before and later added some texts to the source file when you sync, only the inserted text will be copied.
If you need to sync the entire file, you will need to use the ‘-W’ option.
rsync -vrW source/* remoteuser@remotehost:/home/remoteuser/destination
15. Do not sync/copy modified files in the destination directory
Some times when made modifications to files present in the destination folder. If you run a rsync command, these modifications will be overwritten by those in the source file. To avoid such, use the ‘-u’ option.
rsync -vu source/* remoteuser@remotehost:/home/remoteuser/destination
16. Use rsync with ‘-i’ option to view the difference in files between source and destination
If you wish to know what new changes will be made to the destination directory, use the ‘-i’ option, which will show the difference in files between the source and destination directory.
rsync -avzi source/ destination/
d: shows a change in the destination file
f: represents a file
t: shows a change in timestamps
s: indicates a change in the size of a file
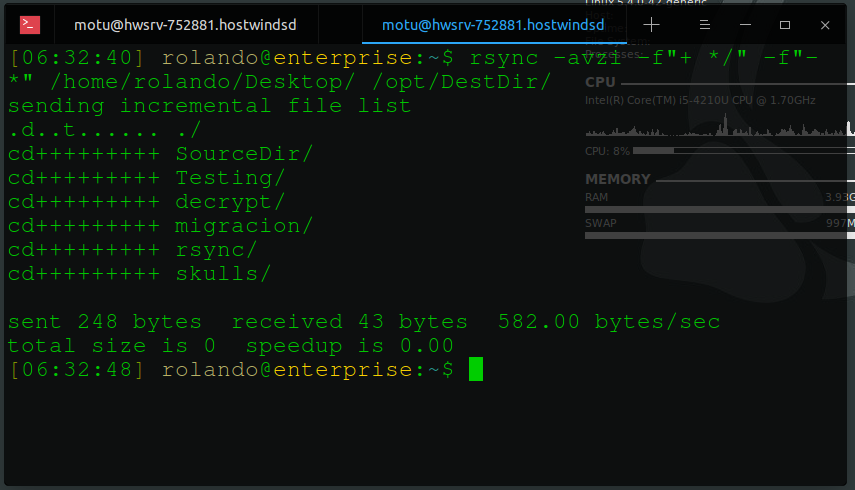
17. Use rsync to copy directory structure only
Rsync can be used to sync only the directory structure. If you are not interested in the files, just need to use the parameters -f”+ */” -f”- *” before the source directory.
rsync -av -f"+ */" -f"- *" /home/localuser/Desktop/source/ /opt/destination/
18. Add date stamp to directory name
You can easily add a date to a directory name. That will add a date stamp to all synchronizations you do with rsync.
To do so, we will append $(date +\\%Y-\\%m-\\%d) to the destination directory.
sudo rsync -rv source/ /etc/destination-$(date +\%Y-\%m-\%d)
19. Copy a single file locally
To sync/copy a single file with rsync, you will need to specify the file path followed by the destination directory path.
rsync -v /home/localuser/source/filetocopy.txt ~/destination/
20. Copying multiple files remotely
To copy (few preferred) multiple files simultaneously, you will need to provide the path to all of them separated by space.
rsync -vr /home/user/Desktop/source/file1.txt /home/user/Desktop/source/file2.txt /home/user/Desktop/source/file3.txt remoteuser@remotehost:/home/remoteuser/destination
